Update Your ALM – The Hipster Way

🧑‍💻 Update Your ALM – The Hipster Way 🎩

In the world of Application Lifecycle Management (ALM), being a hipster isn’t just about wearing glasses and drinking artisanal coffee. ☕ It’s about using the latest tech and best practices to ensure your solutions are compliant, governed, and respectful of privacy. Here’s how we’ve upgraded our ALM setup to be as sleek and modern as a barista’s latte art. 🎨


🌟 Delegated Deployment with SPNs

The backbone of our ALM setup is delegated deployment using a Service Principal (SPN). This ensures that our deployment process is:

  • Secure: Using the SPN credentials, we minimize risks of unauthorized access.
  • Streamlined: Delegated deployment allows automation without compromising governance.

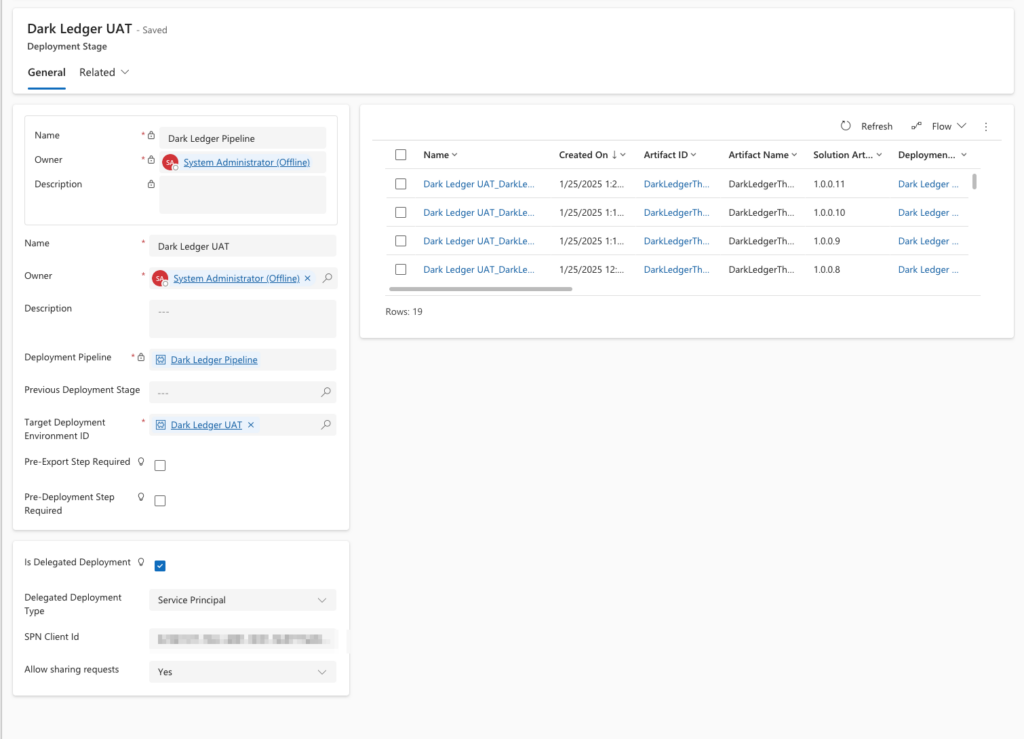
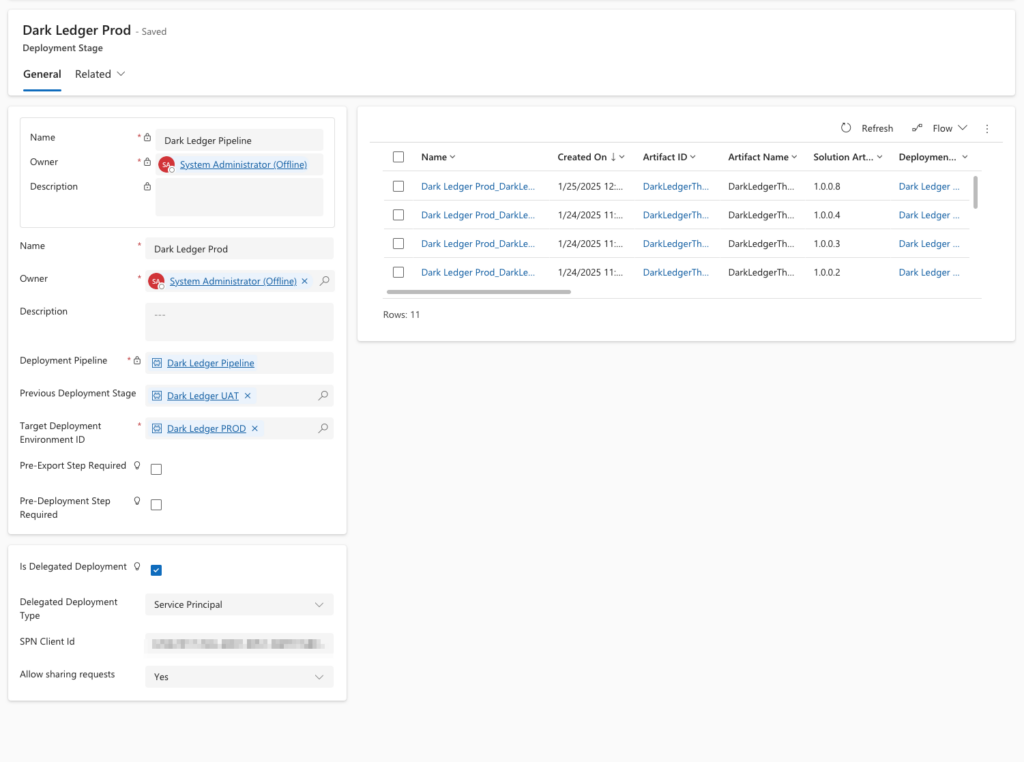
Key configuration steps:

  1. Set “Is Delegated Deployment” to Yes.
  2. Configure the required credentials for the SPN.
UAT:
PROD:

📜 Approval Flows for Deployment

Governance is king 👑, and we’ve built a solid approval process to ensure that no deployment goes rogue:

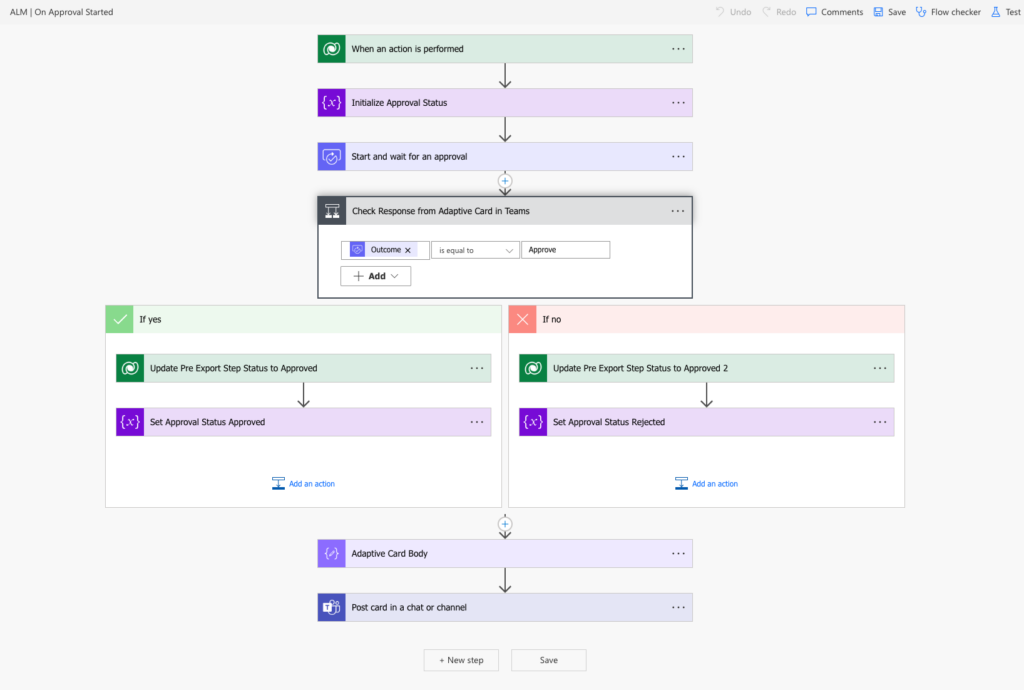
  1. Triggering the Approval:
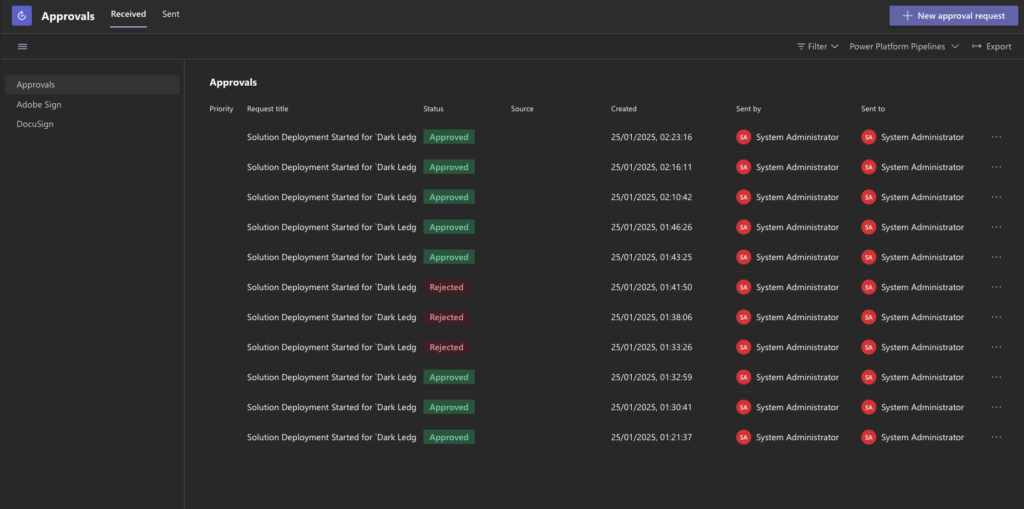
    • On deployment start, a flow triggers the action “OnApprovalStarted”.
    • An approval request is sent to the administrator in Microsoft Teams.
  2. Seamless Collaboration:
    • Once approved, the deployment process kicks off.
    • If rejected, the process halts, protecting production from unwanted changes.
📢 Teams Integration: Keeping Everyone in the Loop

Adaptive Cards are the stars of our communication strategy:

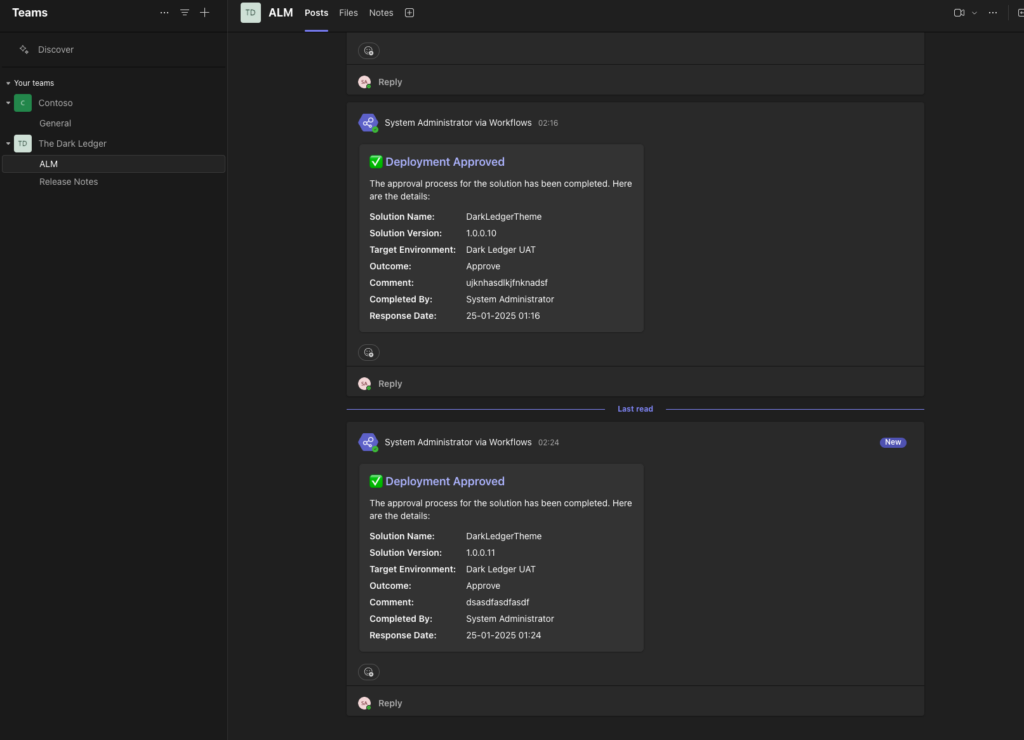
  1. Monitoring Deployments:
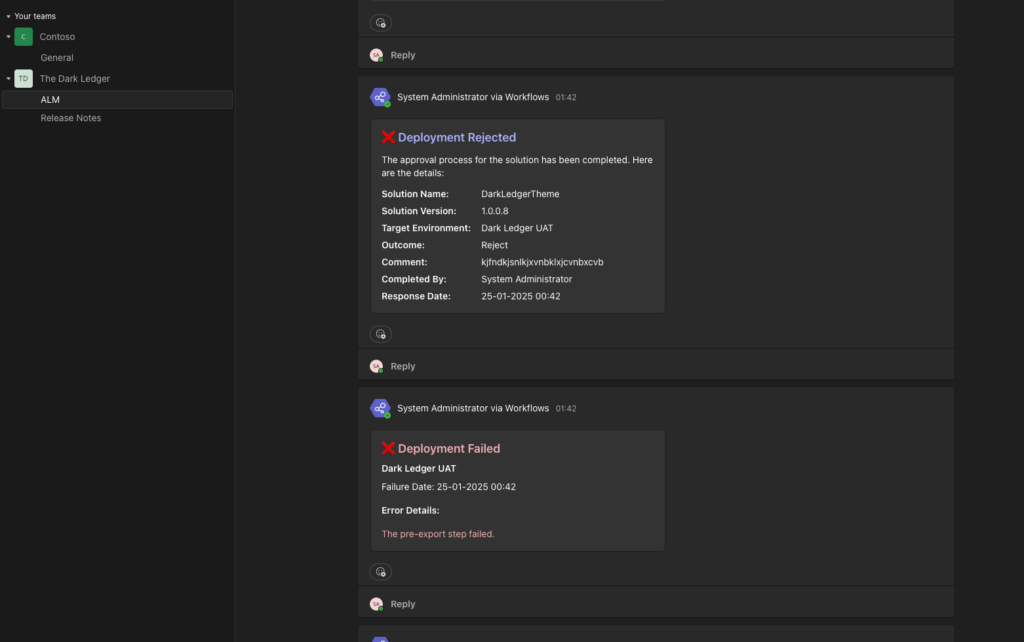
    • Each deployment sends an adaptive card to the “ALM” channel in Microsoft Teams.
    • Developers and stakeholders can easily follow the deployment routine in real-time.
  2. Error Alerts:
    • If a deployment fails, an error flow triggers and sends a detailed adaptive card to the same channel.
    • This ensures transparency and swift troubleshooting.
  3. Release Notes:
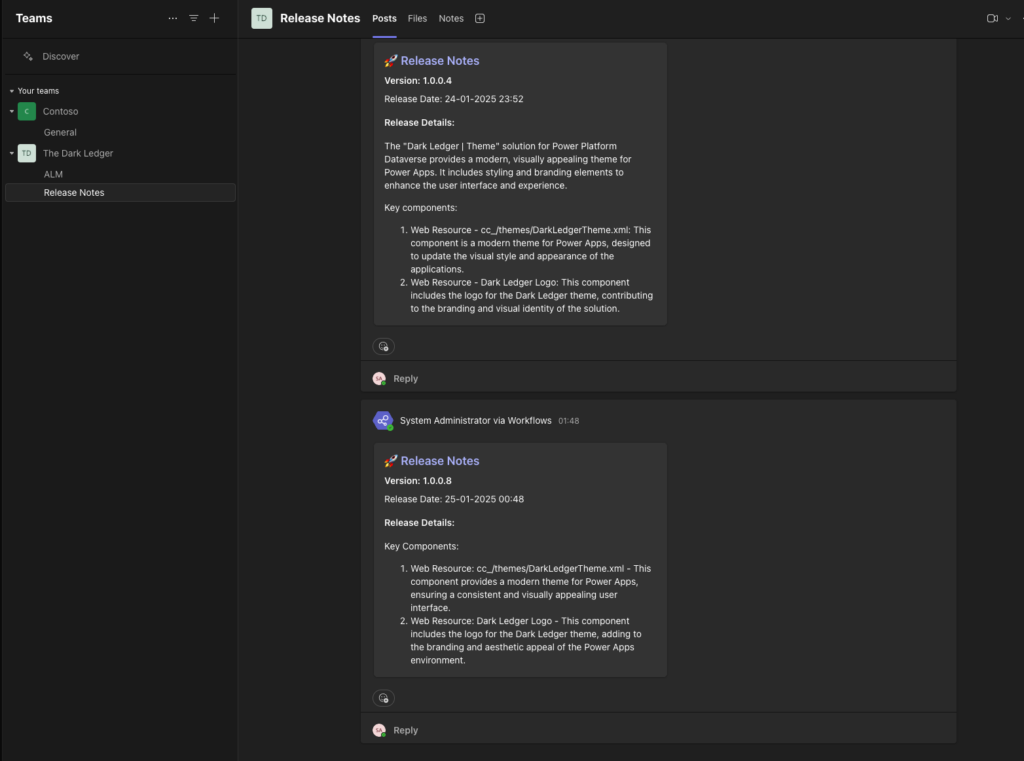
    • Upon a successful production deployment, a flow automatically posts an adaptive card in the “Release Notes” channel.
    • End users can see the latest updates and enhancements at a glance.
🛡️ Why This Matters

Our upgraded ALM setup doesn’t just look cool—it delivers real business value:

  • Compliance: Ensures all deployments follow governance policies.
  • Privacy: Protects sensitive credentials with SPN-based authentication.
  • Efficiency: Automates processes, reducing manual intervention and errors.
  • Transparency: Keeps all stakeholders informed with real-time updates and error reporting.

💡 Lessons from the ALM Hipster Movement

  1. Automation is Key: From approvals to error handling, automation reduces the risk of human error.
  2. Communication is Power: Integrating Teams with adaptive cards keeps everyone in the loop, fostering collaboration.
  3. Governance is Non-Negotiable: With SPNs and approval flows, we’ve built a secure and compliant deployment pipeline.

🌈 The Cool Factor

By blending cutting-edge tech like adaptive cards, Power Automate flows, and Teams integration, we’ve turned a routine ALM process into a modern masterpiece. It’s not just functional—it’s stylish, efficient, and impactful.

PRO CODE AND ALM MAGIC

Part 1: Automating Azure Function App with Durable Functions and CI/CD Pipelines

In our cloud infrastructure, we have designed and implemented an Azure Function App that utilizes Azure Durable Functions to automate a checklist validation process. The function operates in a serverless environment, ensuring scalability, reliability, and efficiency.

To achieve this, we:

Use Durable Functions for long-running workflows and parallel execution.
Implement a timer-triggered function that regularly checks for missing documents.
Deploy using Azure DevOps CI/CD Pipelines for automated deployments and testing.

This post covers Azure Function App architecture, Durable Functions, and our CI/CD pipeline implementation.

🔹 Azure Durable Functions: Why We Chose Them

Our workflow involves:

 –Retrieving all checklists from SharePoint.
Processing them in parallel to check for missing documents.
Updating the checklist if documents are missing.

We use Azure Durable Functions because: Stateful Execution – Remembers past executions. Parallel Execution – Checks multiple users simultaneously. Resilient and Reliable – Handles failures gracefully. Scales Automatically – No need to manage servers.


How Our Durable Function Works

Timer-Triggered Function: Initiates the Orchestrator

This function triggers every 5 minutes, calling the orchestrator.

What It Does:

  • Runs every 5 minutes using a TimerTrigger.
  • Calls ProcessCheckListsOrchestrator (Orchestrator function).
  • Ensures checklist processing happens automatically.

Orchestrator Function: Manages Workflow

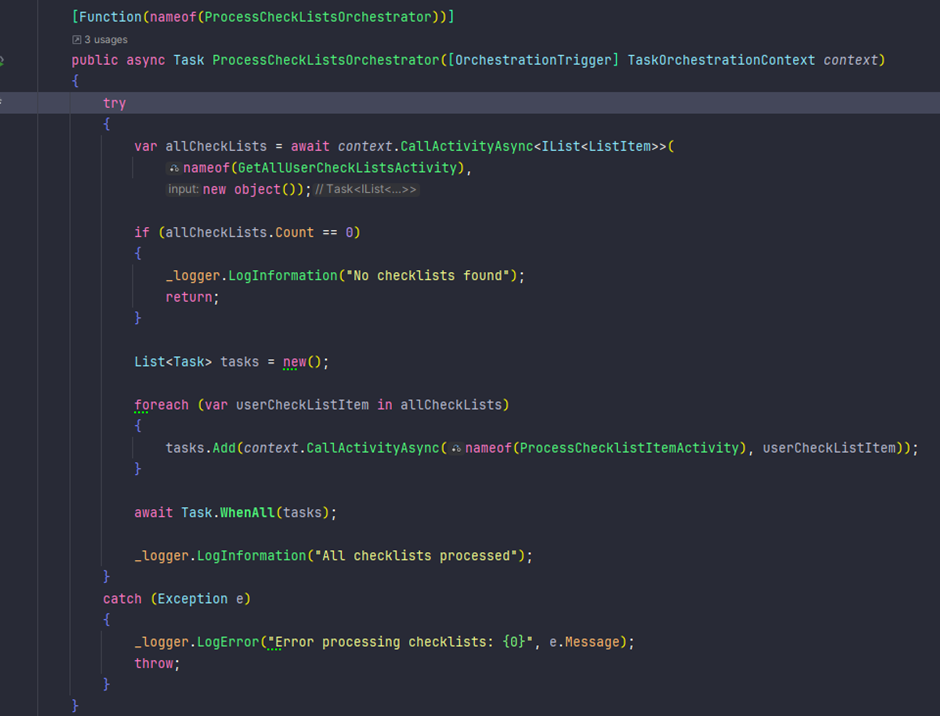
The orchestrator is the brain of the workflow, managing execution and handling parallel processing.

What It Does:

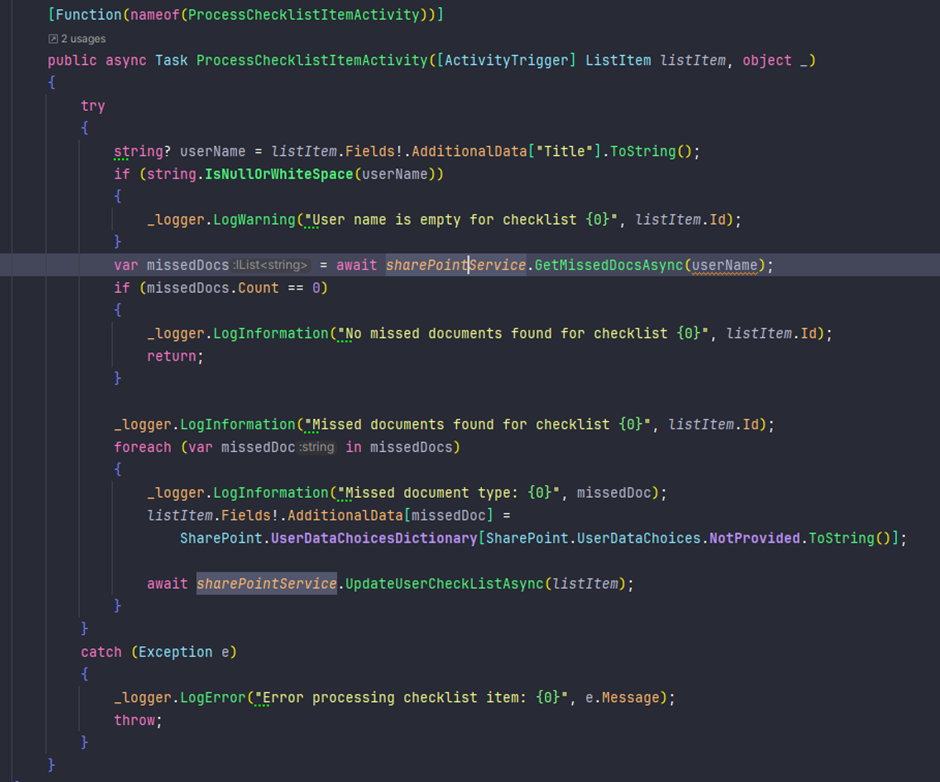
  • Calls GetAllUserCheckListsActivity to fetch checklists.
  • Executes multiple ProcessChecklistItemActivity functions in parallel.
  • Uses Task.WhenAll() to improve performance.
  • Logs errors and ensures fault tolerance.

Activity Functions: Processing Individual Checklist Items

Each activity function is responsible for a specific task.

📌 Get All Checklists

Retrieves all checklists from SharePoint.

📌 Process Individual Checklist Items

What It Does:

  • Retrieves missing documents for a user.
  • Updates the SharePoint checklist accordingly.
  • Handles errors and retries if needed.

PART 2: Automating Deployments with Azure DevOps CI/CD Pipelines

To ensure seamless deployment and updates, we use Azure DevOps Pipelines.

📌 CI/CD Pipeline Breakdown

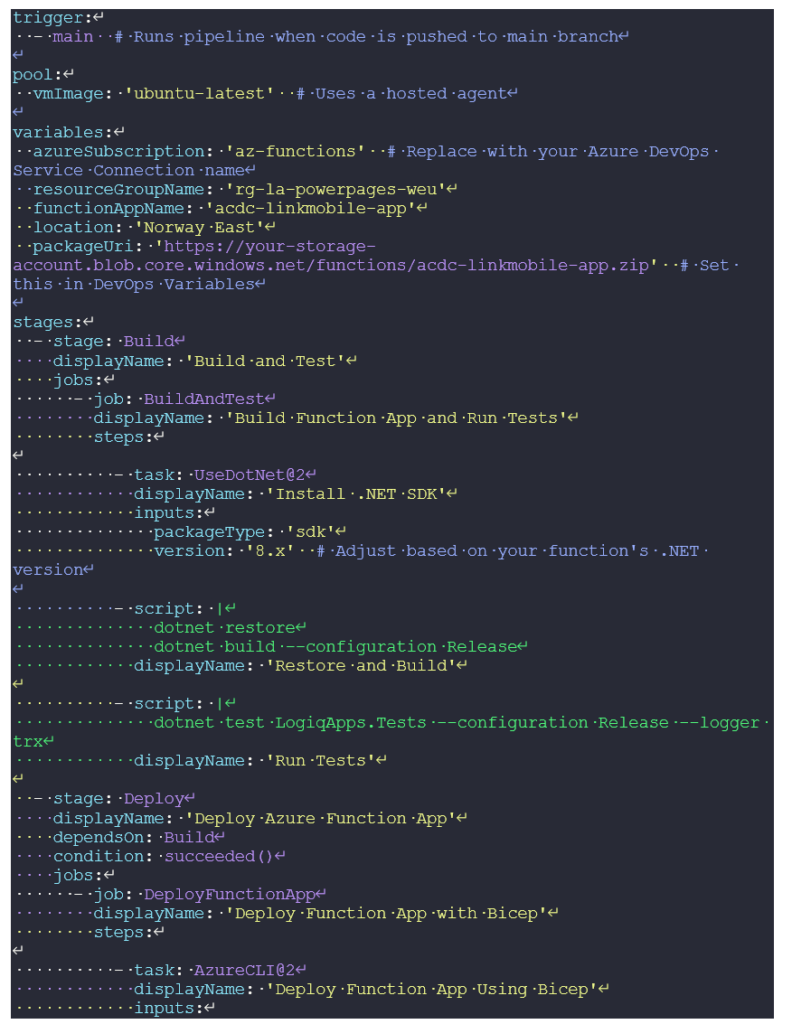
Build Stage – Runs dotnet build and dotnet test.
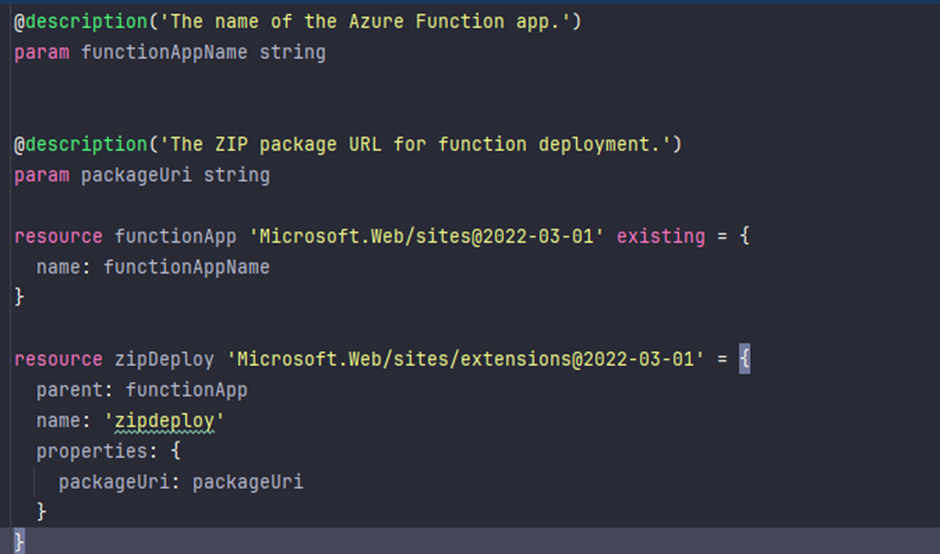
Deploy Stage – Uses Bicep templates (main.bicep) for infrastructure-as-code deployment.


🔹 Azure DevOps Pipeline (azure-pipelines.yml)

We use Azure CLI and Bicep for automated Azure Function deployment.

main.bicep

By leveraging Azure Durable Functions, we transformed a manual checklist validation process into an automated, scalable, and highly resilient system.

With Azure DevOps CI/CD, we now have a fully automated deployment pipeline, ensuring high reliability and faster releases. 💡 Next, we will discuss a new business logic, SharePoint interactions, and integrations in a dedicated post. Stay tuned!

ALM CATEGORY: With the ALM Lumos spell, we illuminate a path to error-free, efficient lifecycle management. 

“Building this solution has been a journey of passion and precision, where every element has been designed with purpose and care. We’re excited to showcase our work as a testament to quality and innovation in pursuit of the ACDC Craftsman badge.

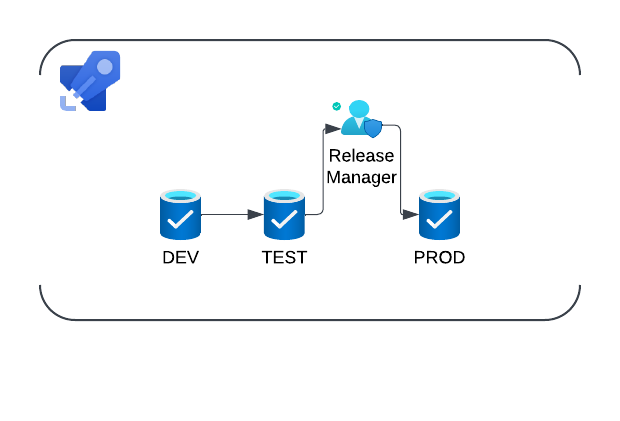
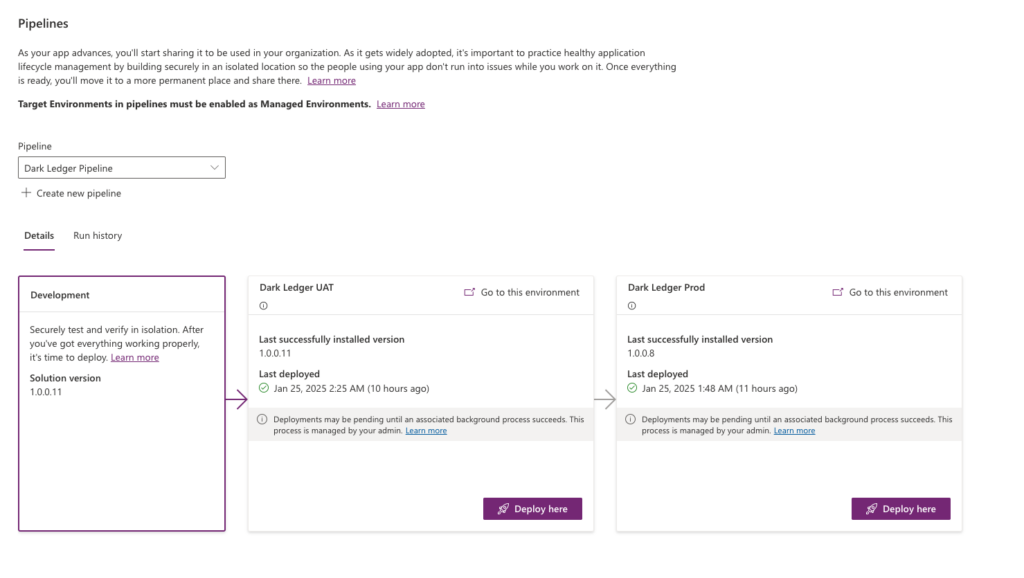
We have three environments, DEV, TEST, and PROD, with different approval flows. 

So, the production environment can be deployed only after the release manager has approved it. 

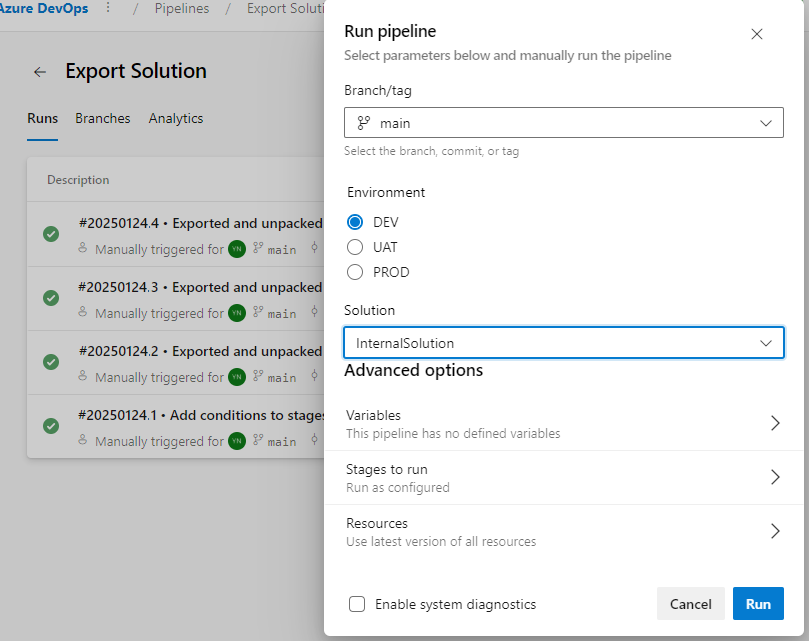
We implemented an Export pipeline to simplify the contribution process.  

Users can decide which solution to export and place in the GIT to track the change’s history. 

For the functional consultants, we implemented the following flow: 

The export procedure includes exporting the managed and unmanaged solution packages. All changes from the selected solution will be included in the PR, and the Solution Checker will start the validation process. A clean report from the Solution Checker is a prerequisite for the next step of the PR review, which requires the real human review step. 

In the case of pro code customization, each component type has its steps for the PR validation, such as: 

  • Run build to produce the artifacts: 
  • Run unit test 
  • Scan the code base with SonarQube (Quality Gate) 

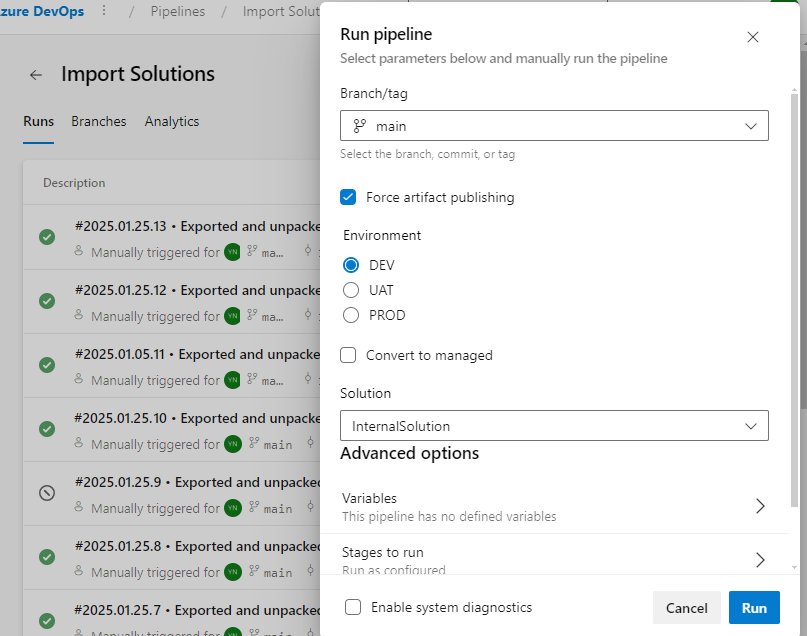
The Import pipeline will deploy the package with a specific type based on the environment, so deployment to PROD will always include only the managed version of the packages. 

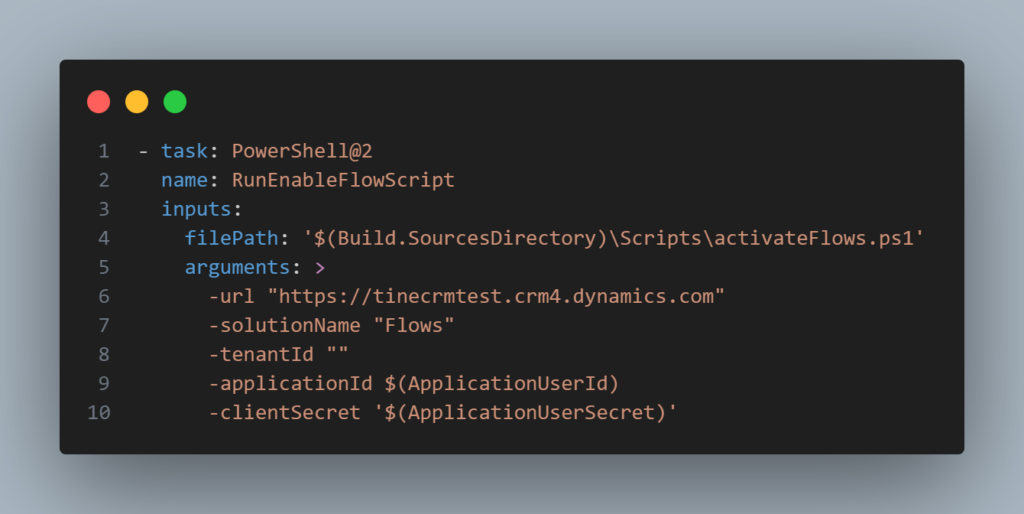
The import pipeline also includes extra steps to activate the flows after deployment, including calling the custom Power Shell script to activate the disabled flows in specific solutions. 

We also use a custom version that reflects the build date and the build number at the end: 2025.01.25.13; from our previous experience, it looks more meaningful to the users. 

Branching strategy: 

We are using a trunk-based branching strategy. Short-lived branches contain as small changes as possible to make the review and validation process simple. 

No room for code with low ambition!

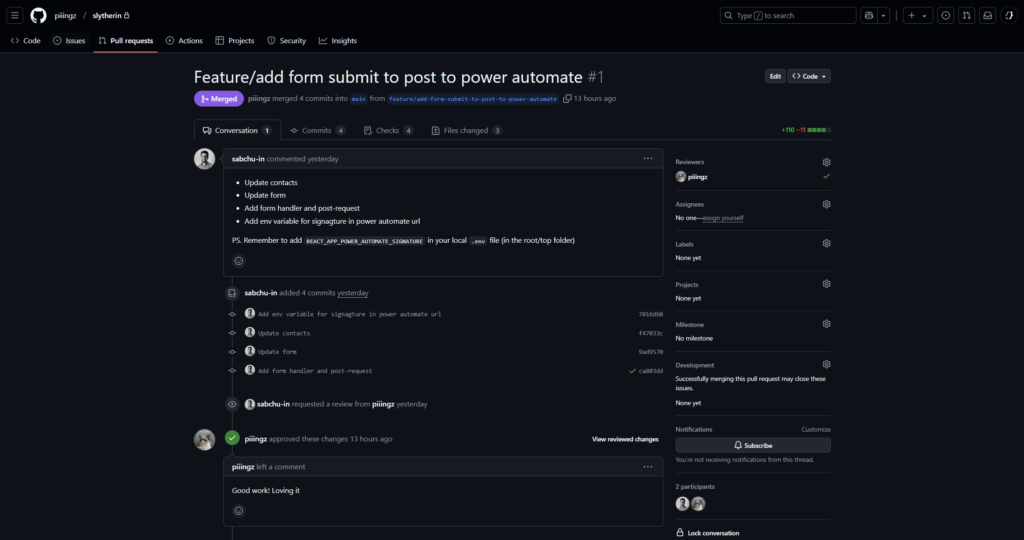
Does the code contain lines with low ambition? No worries, we’ll catch those nasty lines in a PR from a feature-branch into the main-branch, with a proper peer review process.

Commits on the main-branch will trigger a GitHub Actions workflow, using GitHub Secrets to retrieve tokens used in the build-process; and automagically deploying the finished build to our Azure Static Web App.

Automating Fabric Deployment with DevOps Scheduled Pipelines

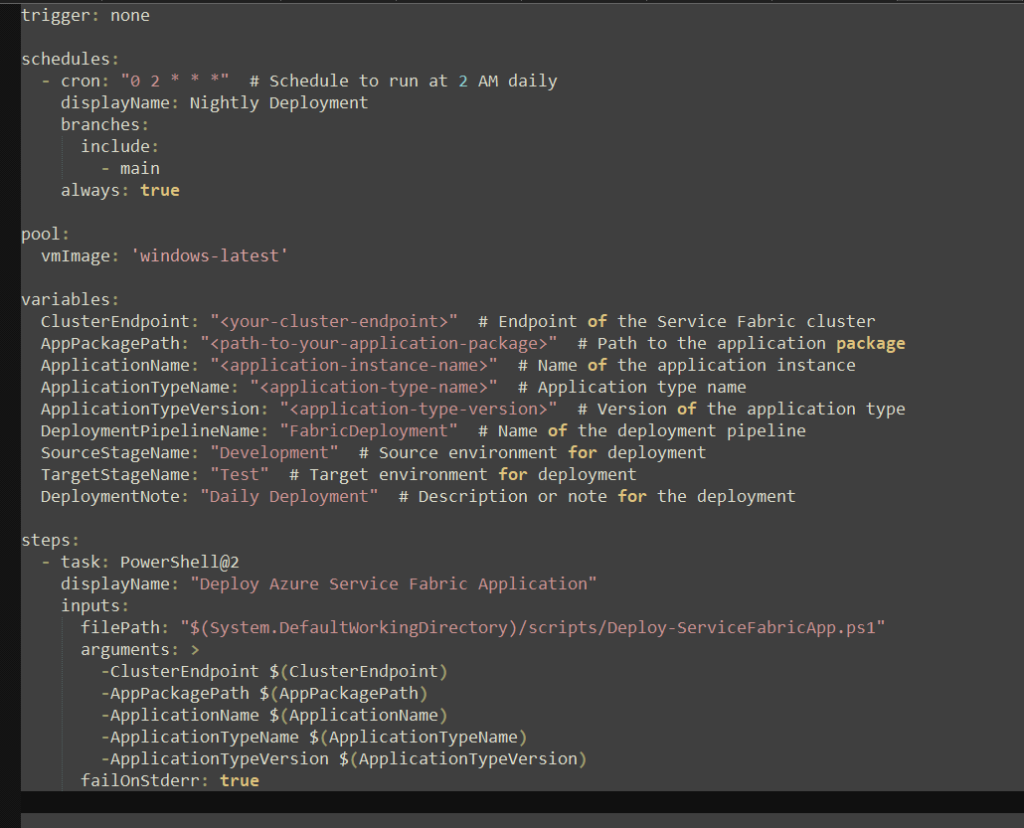
In this article, we’ll are being very serious and will discuss how to set up a DevOps schedule to call a PowerShell script for deploying an Azure Service Fabric application.

Previously, we created a pipeline to promote changes across Development, Test, and Production workspaces. However, a robust Application Lifecycle Management (ALM) process requires more automation. This time, we’ll use scheduled PowerShell scripts in Azure DevOps to streamline deployment tasks.

s


DevOps YAML Pipeline for Scheduled Deployment

trigger: none

schedules:

  – cron: “0 2 * * *”  # Schedule to run at 2 AM daily

    displayName: Nightly Deployment

    branches:

      include:

        – main

    always: true

pool:

  vmImage: ‘windows-latest’

variables:

  ClusterEndpoint: “<your-cluster-endpoint>”  # Endpoint of the Service Fabric cluster

  AppPackagePath: “<path-to-your-application-package>”  # Path to the application package

  ApplicationName: “<application-instance-name>”  # Name of the application instance

  ApplicationTypeName: “<application-type-name>”  # Application type name

  ApplicationTypeVersion: “<application-type-version>”  # Version of the application type

  DeploymentPipelineName: “FabricDeployment”  # Name of the deployment pipeline

  SourceStageName: “Development”  # Source environment for deployment

  TargetStageName: “Test”  # Target environment for deployment

  DeploymentNote: “Daily Deployment”  # Description or note for the deployment

steps:

  – task: PowerShell@2

    displayName: “Deploy Azure Service Fabric Application”

    inputs:

      filePath: “$(System.DefaultWorkingDirectory)/scripts/Deploy-ServiceFabricApp.ps1”

      arguments: >

        -ClusterEndpoint $(ClusterEndpoint)

        -AppPackagePath $(AppPackagePath)

        -ApplicationName $(ApplicationName)

        -ApplicationTypeName $(ApplicationTypeName)

        -ApplicationTypeVersion $(ApplicationTypeVersion)

      failOnStderr: true

Above yaml will call the powershell script in following link.

https://github.com/microsoft/fabric-samples/blob/main/features-samples/fabric-apis/DeploymentPipelines-DeployAll.ps1

Bonus to ALM Magic, Digital Transformation and Low Code!

Kudos to one of our judges @benedikt bergmann for all the work shared at GitHub. We strongly recommend all fellow magic makers here to check it out GitHub – BenediktBergmann/PCFIntro Will it be too much to say, we really want to win a book about Application Lifecycle Management on Microsoft Power Platform?

We also released the PowerPlatform custom connector. That is available in our GitHub repo. The repository also includes GitHub pipeline implementation to release the fresh version of the connector. 

So, you can now use the connector to process the emotional recognition reports by uploading the prepared dataset to SharePoint and notifying the Admin that the artifact is available.

The repo structure is simple enough. 

The repo also contains the release pipelines based on the GitHub actions. 

How to build a new release? 

Follow these steps to manually create a new release on GitHub: 

  1. Create a New Tag: Use the naming convention v.x.x.x.x, where x is a digit. For example: v.1.0.0.0 
  1. Generate Artifacts: Ensure that the artifact name is automatically derived from package/Other/Solution.xml using the UniqueName attribute. 
  1. Update Documentation: Make sure all relevant documentation is up-to-date with the new release details. 
  1. Publish the Release: On GitHub, draft a new release, add the appropriate tag, and upload the managed and unmanaged solution files. 

Artifacts 

Artifacts generated during the release process include two types of solutions: 

  • Managed: This contains the finalized version of the connector, which is ready for deployment. It ensures that all customizations are locked and can be used in production environments. 
  • Unmanaged: This includes the editable version of the connector for further development and customization. It is ideal for testing and development environments. 

CI/CD like a boss

What’s better than automatic deploy pipelines? Not that much really. When merging to main, our React App automatically deploys to Azure Static Web Apps. Pretty neat! All secrets are of course stored in Github Secrets.

Our github workflow:

name: Azure Static Web Apps CI/CD

on:
  push:
    branches:
      - main
  pull_request:
    types: [opened, synchronize, reopened, closed]
    branches:
      - main

jobs:
  build_and_deploy_job:
    if: github.event_name == 'push' || (github.event_name == 'pull_request' && github.event.action != 'closed')
    runs-on: ubuntu-latest
    name: Build and Deploy Job
    steps:
      - uses: actions/checkout@v3
        with:
          submodules: true
          lfs: false
      - name: Set up API Key
        run: echo "API_KEY=${{ secrets.DATAVERSE_API_KEY }}" >> $GITHUB_ENV
      - name: Build And Deploy
        id: builddeploy
        uses: Azure/static-web-apps-deploy@v1
        with:
          azure_static_web_apps_api_token: ${{ secrets.AZURE_STATIC_WEB_APPS_API_TOKEN_THANKFUL_HILL_0CC449203 }}
          repo_token: ${{ secrets.GITHUB_TOKEN }} # Used for Github integrations (i.e. PR comments)
          action: "upload"
          ###### Repository/Build Configurations - These values can be configured to match your app requirements. ######
          # For more information regarding Static Web App workflow configurations, please visit: https://aka.ms/swaworkflowconfig
          app_location: "/" # App source code path
          api_location: "" # Api source code path - optional
          output_location: "build" # Built app content directory - optional
          dataverse_api_key: ${{ secrets.DATAVERSE_API_KEY }}
          ###### End of Repository/Build Configurations ######


  close_pull_request_job:
    if: github.event_name == 'pull_request' && github.event.action == 'closed'
    runs-on: ubuntu-latest
    name: Close Pull Request Job
    steps:
      - name: Close Pull Request
        id: closepullrequest
        uses: Azure/static-web-apps-deploy@v1
        with:
          azure_static_web_apps_api_token: ${{ secrets.AZURE_STATIC_WEB_APPS_API_TOKEN_THANKFUL_HILL_0CC449203 }}
          action: "close"

Faruk the Fabricator Fun with Fabric

Do you remember the Fabricator and his efforts described in the earlier post?

So now the Fabricator created deployment pipelines to always keep his changes across multiple workspace. No change will go unnoticed, no pipeline will flow alone, no developer will overwrite another. That was the promise The Fabricator gave.. And he delivered.

We are using pipelines inside fabric to deploy fabric components between workspaces.

PS: this article is the part 1 of the Power Of The Shell badge claim, due to us using Fabric pipeline. We started working on CI/CD pipelines for Dataverse solutions and Power Pages. Second article is coming when we finish the remaining of the ALM solutions.