Middle-age Mutable Ninja Tuples is scripting its infrastructure!

Our Blazor web app allows people to register as Turtles, meaning they will help others in need. In the field, Turtles use the official Dynamics mobile app. To use the official app, users need an Azure AD user with a Dynamics license and a security role in Dynamics.

Instead of having to manually create users in Azure AD and assign licenses and Dynamics security roles, this infrastructure is programmatically set up.

The backend of the Blazor web app uses a custom Azure API client which programmatically sets up the infrastructure: creation of Azure AD users and assigning of Dynamics licenses.

Because of our Infrastructure as Code, users are able to use the official Dynamics mobile app automatically after registering – no manual steps required!

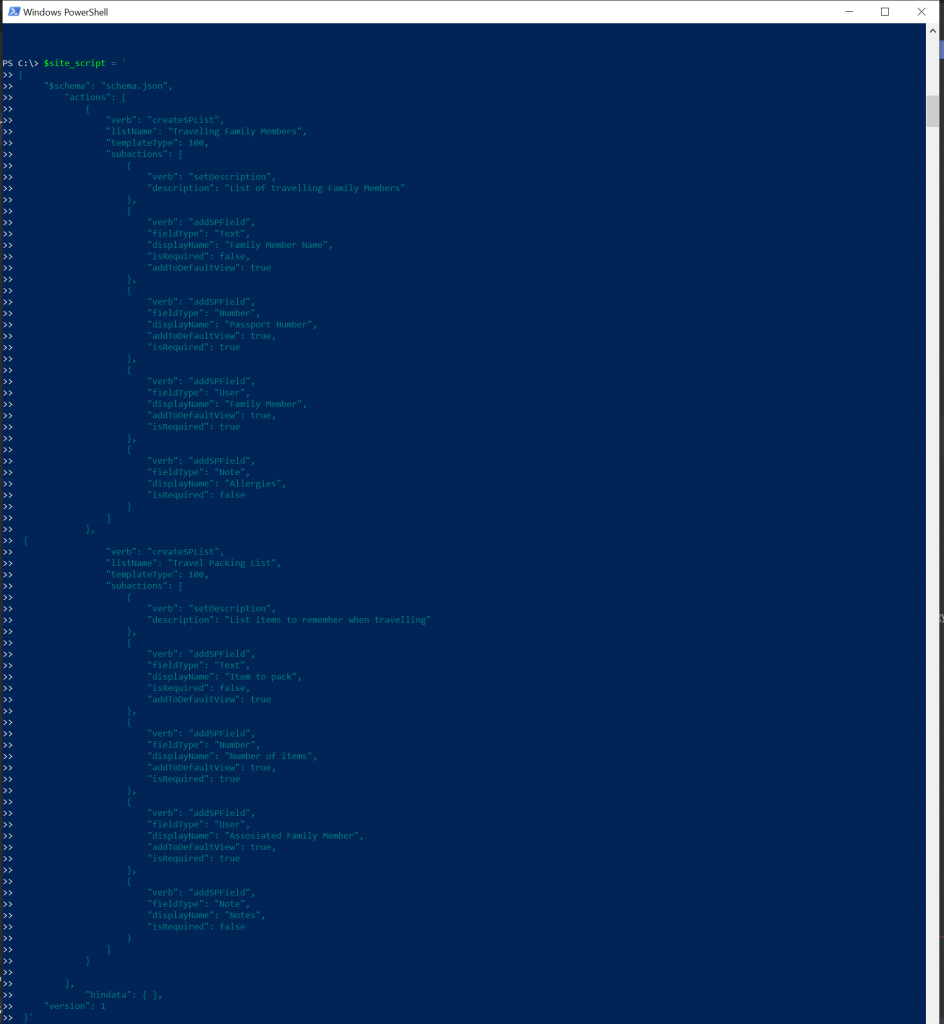
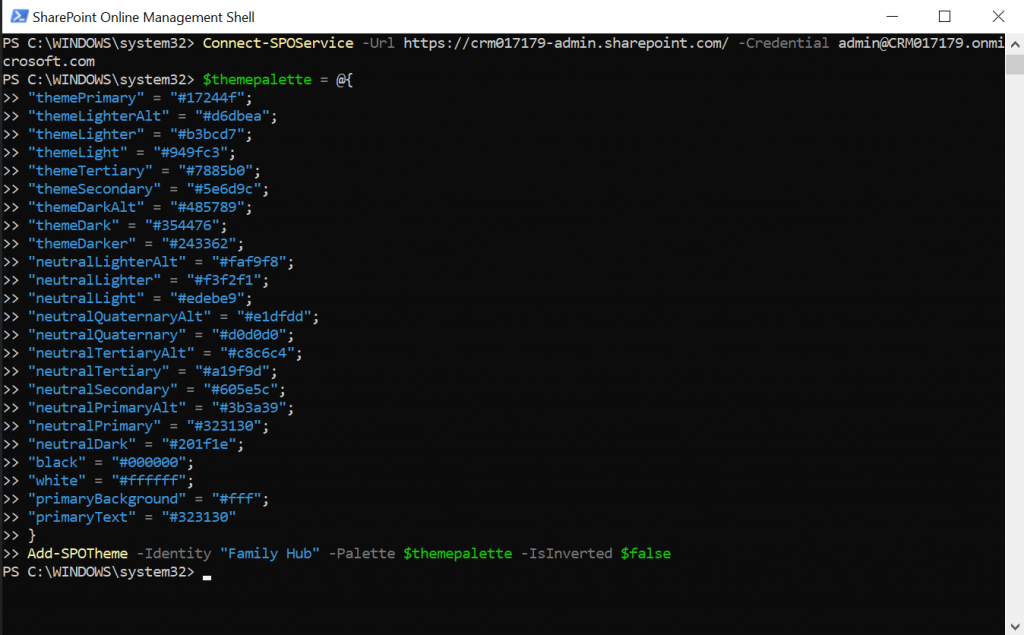
The following image shows the method that creates an Azure AD user and assigns the Dynamics license.

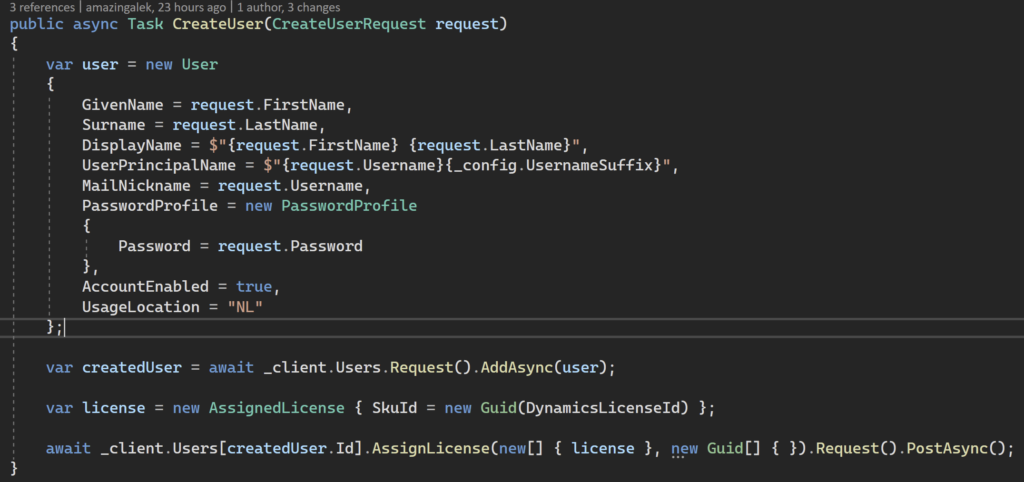
Interaction with Azure AD is done using GraphServiceClient from the Microsoft.Graph NuGet package. Authentication is done using an Access Token retrieved using functionality from the Microsoft.Identity NuGet package.

Shell is power!

Can you feel the power of this?

In order to ship our components from development to prodction we have leveraged several technologies.

Dataverse

In order to export our solution for dataverse we have built a set of yaml based pipelines in azure devops. We have isolated the tasks to their own separate template files which are then called when needed, allowing for simple reuse of functionality.

Azure

To deploy our azure resources we have used bicep instead of armtemplates. These are leveraged in azure devops pipelines. We have created templates for the individual types of components as illustrated below.

PowerShell with Portals CLI

Power Apps Portals can be handled using Portals CLI that became available this winter.

Documentation here:

https://docs.microsoft.com/en-us/powerapps/maker/portals/power-apps-cli

ALM Best practise

Working this way is best practise for Application Lifecycle Management (ALM) and makes it possible to deploy portals to dev, test and production in a painful and fluent way.

Powershell with Portals CLI

We use PowerShell to handle Portals commands to authenticate, create auth profiles, download and upload portal content. This enables us to use Visual Studio Code when working with Portals code.

Auth

Download

Portal code in VS code

Governance on SharePoint site themes – Issue #1 now resolved

Github issue #1 is now addressed and resolved.

Iterating on the light/dark theme upload scripts TMNT IT management has added the capability to iterate over all SharePoint sites and apply the dark theme as default.

The updated script https://github.com/EivindBerge/PIZZA-TIME-ACDC-2022/blob/main/theming/site-theme-management-tmnt.ps1 is running in a scheduled Azure Run Book using PowerShell Core 7.1. SharePoint Online Credentials are as runbook credentials, which is sufficient for this scenario. Key Vault could of course be an option, or even better using a certificate – but as IT is very centralized this works for the time being.

Credential
Runbook
A job well done
Inverted theme applied!

We have also added more code and security scanning tools to also cover PowerShell scripts and find more general security issues.

CI/CD yaml

  • Bruker bygg i DevOps med trigger på commit i GitHub repo for å bygge servicen; Yaml script

Release trigger som legger rett ut i prod

Deilig med CI/CD, da får man litt tid til å drikke kaffe også, mens MS og GIthub jobber.

  • Release av static webpage på commit fra github
Power of the shell

Dude, where’s my dog?

Ever wondered where your dog are when there’s no food around? How about asking Cortana, Siri, Alexa, or even better Boten Anna?

We have created an integrated solution, with CI/CD in Azure Devops, Cognitive Services, Azure Functions and Power Virtual Agent.

The solution starts with an Azure Function written in Visual Studio.

When code is completed, committed and Pull Requested into the main branch, our CICD pipeline (YML) fires and pushes the solution to Azure Functions

The Azure function is running with a set of pre-captured surveillance images (Due to GDPR we are not using live video). Each folder consists of three photos, one from the kitchen, one from the hallway and one from the livingroom.

Azure Blob storage

Each of these photos will be evaluated with the cognitive service vision functionality. Each of the evaulated photos will be returned with an url for the user to check, and with a textual answer to where the dog is actually located.


Boten Anna

The evaluated images:

https://acdc2021storage.blob.core.windows.net/dogimages/DogOrder/03/gang.jpeg
https://acdc2021storage.blob.core.windows.net/dogimages/DogOrder/03/kjokken.jpeg
https://acdc2021storage.blob.core.windows.net/dogimages/DogOrder/03/stue.jpeg

With this solution we claim the following badges:

  1. Power User Love – for usage of the Power Virtual Agent
  2. Stairway to Heaven – For the usage of Azure Devops, Azure Functions, Cognitive Service, Azure Storage, Power Virtual Agent
  3. Power of the shell – for the CI/CD YML publishing
  4. The Existential Risk – for usage of AI through Cognitive Service Vision
Power User Love
Stairway to heaven
power of the shell
the existential risk

SharePoint Online Site Design powered by PowerShell

It’s important to keep branding consistent across SharePoint Sites. Family members can create travel sites and it will be provisioned with the correct colors, icons and travel lists.

We have crated a Site Script and a site design and deployed it to the SharePoint site for D365 Family Engagement Hub. When a family is planing a new vaication or travel they can create a new site that already have lists they need to plan their stay.

Site Script

First we set the script by identifying the lists with name, description and fields.

Then the final line to add the script

Add-SPOSiteScript -Title “Family Travel Site” -Content $site_script -Description “Create a list for to keep up with traveling family memebers”

The response was a site script with ID

The ID we used in the adding a site design with the site script

Add-SPOSiteDesign -Title “D365 Family Engagement Hub – Travel Site” -WebTemplate “64” -SiteScripts “1131785c-864c-4262-a3ae-b2c9664bfcb6” -Description “The travel site is for planning a trip or travel for the family”

Response

The result was a site design that we can use from the user interface or use another live of powershell to set on a site:

Add-SPOSiteDesignTask -SiteDesignId c56a394b-a99b-4b75-8e93-01a927b7ccf6  -WebUrl “https://crm017179.sharepoint.com/sites/family

The result was a report of what design, web and site was combined:

When we visit the site we can see that it has two new lists:

The packing list contain the fields that we set:

IF family members want to create new sites they can now choose this travel site design:

That is good user experience!

Used this guide for PowerShell scripts: Get started creating SharePoint site designs and site scripts | Microsoft Docs

Grant access to user group

This script will exclude access to all users but those who are members of this specific user group (email enabled) “family Members”

Doing the Get to validate that the permissions were set.

When the users NOT in this group try to use the site design they will not see it – making it possible to family users only to access the site script and site design.

We claim these badges

and for the category

SharePoint Branding #GlossyPixels #QueenWatevraWa-nabi

Going for the Glossy Pixels Badge because it looks good

The Retro Badge is also applicable because someone think it belong in the past:

And I use PowerShell, so

and points in the category for the awesome work that went into creating a graphical profile.

Graphical Profile

We created an Icon for our App called “D365 Family Engagement Hub”

Color Theme

In addition we created a color theme that will be used across all our apps and services:

Microsoft 365 Admin Branding

The first thing is Organisation theming in the Microsoft 365 Admin Center

The result is a Tob Bar that look like this:

SharePoint Site Theme

https://fabricweb.z5.web.core.windows.net/pr-deploy-site/refs/heads/7.0/theming-designer/index.html

The generated Theme

@{
“themePrimary” = “#17244f”;
“themeLighterAlt” = “#d6dbea”;
“themeLighter” = “#b3bcd7”;
“themeLight” = “#949fc3”;
“themeTertiary” = “#7885b0”;
“themeSecondary” = “#5e6d9c”;
“themeDarkAlt” = “#485789”;
“themeDark” = “#354476”;
“themeDarker” = “#243362”;
“neutralLighterAlt” = “#faf9f8”;
“neutralLighter” = “#f3f2f1”;
“neutralLight” = “#edebe9”;
“neutralQuaternaryAlt” = “#e1dfdd”;
“neutralQuaternary” = “#d0d0d0”;
“neutralTertiaryAlt” = “#c8c6c4”;
“neutralTertiary” = “#a19f9d”;
“neutralSecondary” = “#605e5c”;
“neutralPrimaryAlt” = “#3b3a39”;
“neutralPrimary” = “#323130”;
“neutralDark” = “#201f1e”;
“black” = “#000000”;
“white” = “#ffffff”;
}

SharePoint Online Management Shell

Apply theme with PowerShell based on the theme we generated.

Apply theme

Moving into SharePoint Online and choose the new theme in the site setting “Change the look”.

The colors are applied across the site.

Setting the header

Uploading pictures as logo and thumbnail and setting the header according to the style guide.

Fotter

Setting the footer is also important on a SharePoint site.

This is simple branding in SharePoint Online Modern sites. To take it one step further you can also create Site Designs that will allow users to add sites to SharePoint fully branded with a set of default features and content available from the get go.

That will be another blog post..